Your All-Encompassing Guide to Stevens Grip on Marimba
- August 5, 2025

So you want to learn more about how to play Stevens grip for marimba. You’ve come to the right place! I’ve compiled these articles from Stevens’ very own book “Method of Movement for Marimba,” and have structured them in a way that makes sense to me.
The target for this article is someone who wants to truly digest the lessons in Method of Movement for Marimba, but maybe doesn’t have access to the book or wants another perspective on certain topics. Either way, I’m glad you’re here and feel free to ask me any questions on my socials or email me at logan@logangordy.com. I look forward to continuing to make content for you!
I’ve included links to specific parts of my YouTube video on Stevens Grip if you learn better from that format or I didn’t explain something properly in this article. Enjoy!
Table of Contents:
1. Holding the Mallets
2. How to Play Double Verticals with Stevens Grip on Marimba
3. How to Play Single Independents (and Single Alternating) with Stevens Grip on Marimba
4. How to Play Double Laterals with Stevens Grip on Marimba
5. How to Play Octaves (& Other Large Intervals) with Stevens Grip on Marimba
6. How to Create Dark and Bright Sounds on Marimba (Beating Spots)
How to play Stevens Grip on Marimba
Clicking play on the video will start at the chapter on holding mallets.
1. Holding the Mallets with Stevens Grip
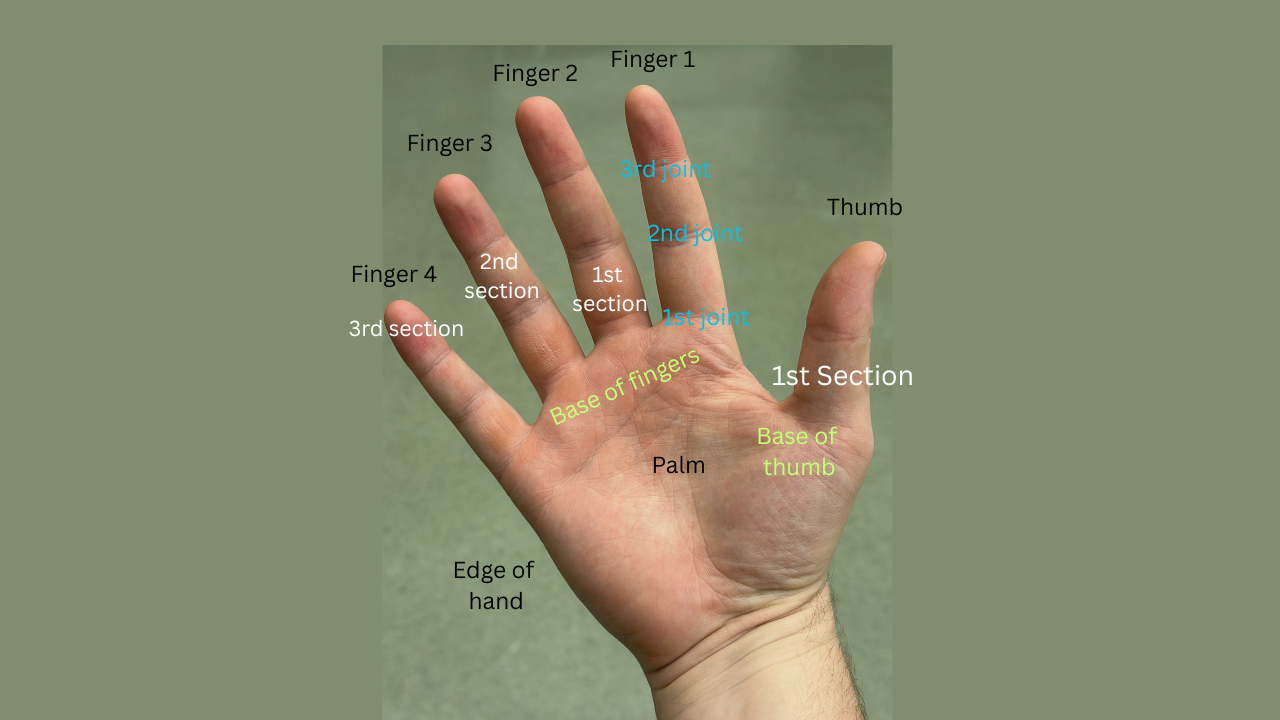
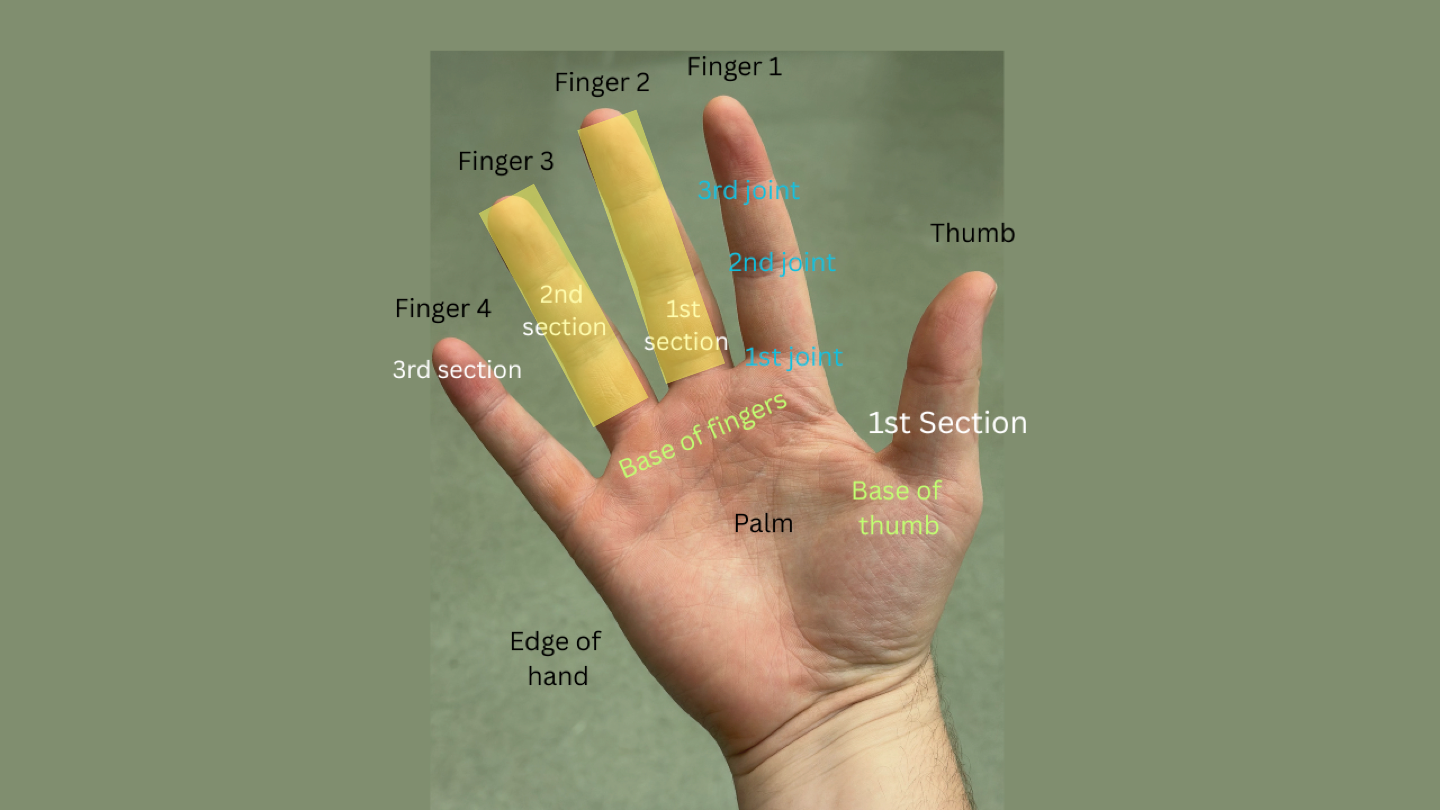
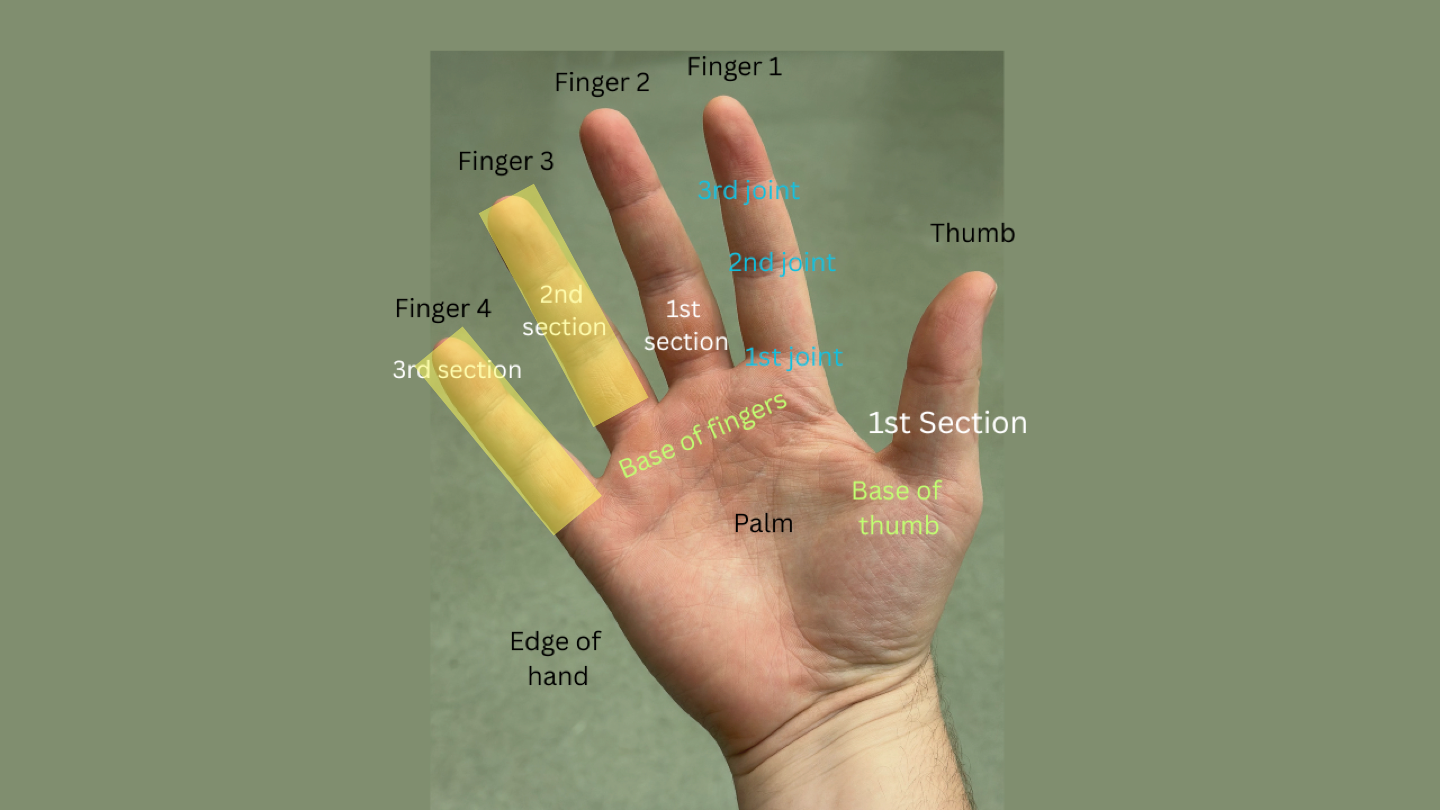
The diagram above is Stevens’ labeling system for the hand in “Method of Movement for Marimba.” I’m going to highlight the parts of the hand I refer to as we go.
Steps 1 and 2 place our outer mallet, while steps 3-5 place our inner mallet. Start with one hand at a time, and you will eventually become proficient in quickly picking up mallets.
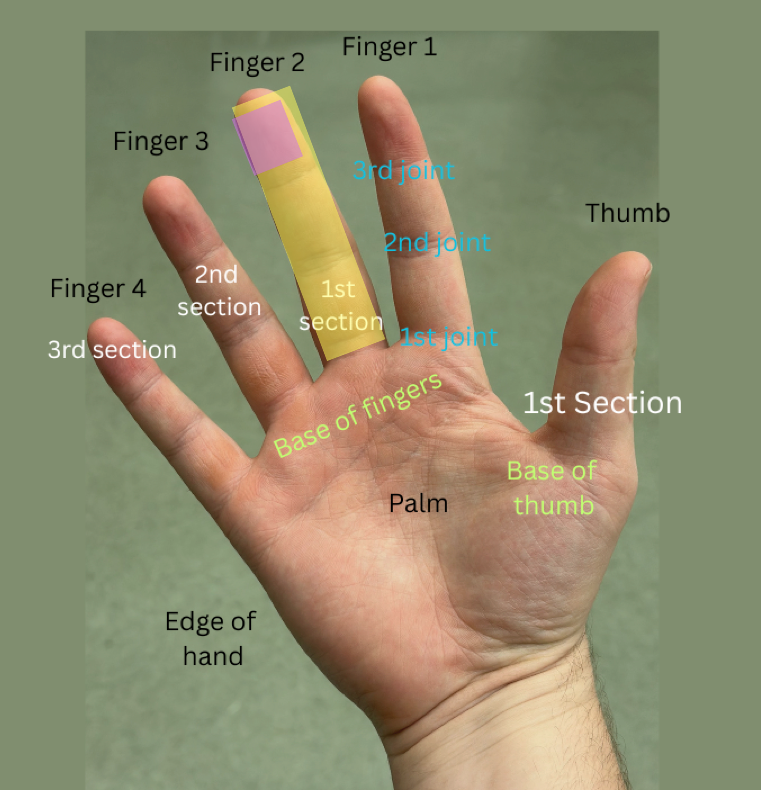
Step 1: Keep your wrist and fingers relaxed and insert the shaft of the mallet in-between finger 2 (middle finger) and finger 3 (ring finger).
Keep about ¼ of an inch of the mallet sticking out of the bottom of finger 4 (pinky finger), and rest the shaft on the 2nd joint of finger 3.
Step 2: Curl both fingers 3 and 4 around that mallet until your fingertips touch the palm.
Your mallet will hang in position, the weight of the mallet head pulling slightly on both fingers.
Tip: The shaft should lie on top of finger 3’s 2nd joint, and beneath the first section of finger 2. *The mallet should NOT be directly under any of finger 2’s joints.
Step 3: With your empty hand, take and place the butt of your other mallet into the fleshy part of your palm, about 1-1½ inches below the base of your thumb.
Rest the shaft on the 3rd joint of your finger 1 (index finger). The weight of the mallet head will pull down, but it will be balanced by the flesh of your palm.
Note: You might have been taught to put the butt of the stick either in the center of your palm or just off-center. This is generally okay, but I don’t want you to get the impression that if the inner mallet is not perfectly centered in your palm, you’re somehow doing it “wrong.”
Step 4: Drop your thumb onto the handle, with your thumb pad directly across from the 3rd joint of finger 1.
Step 5: Curl your finger 2 (middle finger) so the pad touches the end of the inside mallet shaft.
All fingers should be relaxed. The inside mallet head should hang about 1-1½ inches longer than the outside mallet head. At playing position, the heads of the mallets will be horizontally even and rest about 4-6 inches above the board.
Holding the mallets correctly is almost effortless.
This is how Stevens’ grip should feel in your hand. You’ll get more comfortable with this in time, but forming correct habits from the beginning will set you up for success for years to come.
2. How to Play Double Verticals with Stevens Grip on Marimba
Clicking play on the video will start at the chapter on double verticals.
Need to Know Vocabulary:
Double Vertical | Four-mallet stroke that strikes two distinct pitches simultaneously with mallets of the same hand. |
Interval | The distance between two pitches. |
Accidental | Raised (sharps) or lowered (flats) pitches; on marimba, it’s the bars on the higher horizontal plane. |
Wrist Rotation/Hand Position Angle* | The amount of rotation that your wrist is held at any given moment. Unit = º Ex. 0º = palm down, 90º = palm facing inward. |
Elbow Distance* | The distance of your elbow from your body. |
Anatomy of the Attack
To be able to properly perform a double vertical, we must take two things into consideration:
- Hand position (aka wrist rotation)
- Elbow Position
1. Hand Position (aka “Wrist Rotation”)
Quickly, let’s talk about hand position.
Hand position, or as I like to call it “wrist rotation”, is a term we use to describe the amount of rotation that the wrist has in relation to the board. This is the same idea as hand position at 45° and 45° with matched snare drum grip (as I went over here). Wrist rotation (hand position) at 0º is the palm completely flat and held downward, facing the board from above. At this angle, the nails of your thumbs will face each other. Wrist rotation at 90º is completely perpendicular and sees your thumbnails pointing straight up to the ceiling.
Don’t play with your thumb sticking straight up! If you perform the double vertical with your hand position at 90°, you’ll need an awkward, small and stiff wrist arc to help perform the stroke.
What Wrist Rotation angle is appropriate?
Beginning at rest position and when the interval is small and on a level plane, rotate the wrist so that the outside edge of your hand faces a little outward (right hand = counterclockwise, left hand = clockwise). The goal is a wrist rotation just short of perpendicular, at about 80-89°. If the accidental is on the inside mallet, then rotate your wrist inward to a more vertical position, even going past perpendicular if needed, so about 80°-100°. If the accidental is on the outside, rotate outward to a more flat-palmed hand position at 45°-80°.
The latter two types of interval configurations can get awkward extremely quickly, so I made a chart to help visualize the movement for your practice:
Relationship between Wrist Rotation & Interval Configuration | |
Interval Configuration | Wrist Rotation Angle |
Same plane | 80-89º |
Accidental on outside mallet | 45-80º |
Accidental on inside mallet | 80-100º |
2. Elbow Position
If our accidentals are on the outside mallets, jut your elbows out to the side to help perform the awkward interval.
Take the B-flat major chord for example. Line up B-flat, D, F, and another B-flat under your mallets 1-4. If we hold our elbows close to our body, then this becomes almost impossible to perform, and definitely impossible to perform consistently! The easiest way to fix this is to raise your elbows (not your shoulders!) while the wrist rotation angle decreases.
It is for this reason that I say your wrist rotation and elbow distance are linked.
As the wrist rotation angle approaches 90º+, our elbows get closer to our bodies, and vice versa.
For quick interval changes from accidental on one mallet to the other, “snap” the elbow to and away from your body while keeping your wrist relaxed.
The Double Vertical Motion
As the wrist rotation angle increases, the double vertical stroke becomes more of a rotary twist, like a single independent. The further the wrist rotation angle decreases, the more the stroke hinges off the wrist, like a snare or two-mallet stroke, like we’re simply knocking on a door. Learn more about the piston stroke here.
Below is a chart that links interval configuration, wrist rotation, and elbow distance:
Relationship between Interval Configuration, Wrist Rotation & Elbow Distance | ||
Interval Configuration | Wrist Rotation Angle | Elbow Distance |
Same plane | 80-89º | comfortable |
Accidental on outside mallet | 45-80º | away |
Accidental on inside mallet | 80-100º | near |
Keep your fingers relaxed and understand that the interval comes from the fingers while the stroke is from the wrist. *The stroke does not come from your ARM!
Play with a complete piston stroke. (No prep or lift before striking!) The stroke should feel as if the mallet head is bouncing off the bar and your hand will feel like it’s following the mallet heads back into position. The mass of the mallet heads will create a smooth trajectory to the bars as you strike.
In Review
1. A double vertical is a stroke that strikes two distinct pitches simultaneously.
2. Don’t play DVs with thumb sticking straight up unless the accidentals are on the inside. Rotate thumbs inward slightly.
3. If accidentals on outside, elbows out; if accidentals on inside, elbows in.
4. The larger the wrist rotation angle, the more rotary twist needed.
5. Piston stroke hinging from the wrist!
Practice with this checklist in mind, and check out the rest of the blog if this was helpful to you!
3. How to Play Single Independents (and Single Alternating) with Stevens Grip on Marimba
Clicking play on the video will start at the chapter on single independents & single alternating strokes.
The Single Independent Stroke
The single independent stroke is the striking of one note using the torque of the wrist without moving the other, unused mallet. I like to think of the single independent as one mallet head orbiting around the other like a planet and its sun.
When striking, the mallet should return to the same height it began, like a piston stroke.
The Single Independent Motion
Step 1. Empty your hands.
Step 2. Place your right hand in position to shake someone’s hand.
Step 3. Now, with that same hand, pretend you are holding a lightbulb and screw it into an outlet in the wall. The motion of screwing in is clockwise and would be playing a single independent in your mallet 4. If we were unscrewing the lightbulb (going counterclockwise), then we’d be playing with mallet 3.
Now try with your mallets in hand. Because your fingers act as shock absorbers for any misdirected energy, you want to keep them relaxed. Your unused mallet will stay still if you are properly relaxed and pivoting around that mallet.
A Stability Exercise
An exercise for you to try: reach over the inner mallet and lightly cup the unused mallet in the palm of your hand while playing. Keep the unused mallet still by feeling for any movement, rather than holding it in place with your hand.
Tip
The smaller the interval, the more torque your wrist will need to play at the same dynamic. It’s because of this that it is easier to practice single independents at an interval of a fifth (C-G) or sixth (C-A) rather than a third (C-E).
Overview of Single Independent Strokes:
1. The striking mallet head pivots around the unused mallet head.
2. The stroke comes from the wrist, not the fingers.
3. When striking, immediately return to the height your mallet began.
4. Keep fingers relaxed, as they are the shock absorbers for misdirected energy.
The Single Alternating Stroke
A single alternating stroke is one hand playing multiple pitches successively with alternating mallets. (1 to 2 or 3 to 4, vice versa)
The Single Alternating Motion
Single alternating strokes are like single independents, but the motion is pretty different. Rather than pivoting around one mallet or the other, as with single independents, single alternating strokes involve a shifting pivot point, creating the idea of multiple pivot points.
The motion is still produced from the wrist, but we use some vertical and forward hand movement to rock the pivot point back and forth. Because of the multiple pivot points, there isn’t a need to keep the unused mallet motionless, keeping in mind these are still two different motions for each note. When performed correctly, the mallet not currently striking the board will tend to shoot up a centimeter or so while the other descends to the bar. (Like a seesaw!)
The descent of one mallet will produce or complete the recovery of the other.
Where Should My Pivot Point Be?
The relative dynamics between mallets on one hand will determine the position of the axle or pivot point. The location of the pivot point is relative to the dynamics between mallets of the same hand.
Main Idea: The pivot point of the stroke is always closer to the handle of the mallet with the lower dynamic level.
For example, if we have a piano or quiet dynamic in mallet 1 and a forte in mallet 2, I’m imagining the pivot point about 10 degrees away from mallet 1 since I need more torque to play the forte on mallet 2. (Watch my video above at 17:10 for a visual representation).
Overview of Single Alternating Strokes:
1. Single alternating strokes have a shifting pivot point.
2. Single alternating strokes are two distinct motions, one for each individual note.
3. We do not have to keep the unused mallet still when using single alt. strokes.
4. The descent of one mallet will produce or complete the recovery of the other.
5. The location of the pivot point is determined by the relative dynamics between mallets of the same hand.
4. How to Play Double Laterals with Stevens Grip on Marimba
Clicking play on the video will start at the chapter on double laterals.
The Double Lateral Motion
A double lateral stroke is a single, quick motion for two consecutive pitches and are easier at large intervals, such as sixths to octaves. Unlike single independents or single alternating strokes, the double lateral is one motion for two notes. This motion does not function slowly, so when practicing, keep the quick motion and even if you slow down the tempo, don’t slow the tempo of your motion.
The double lateral outside to inside stroke begins as a double vertical with a raised inner mallet and transforms into a single independent motion immediately following the outer mallet hitting the bar. The rotary twist of the single independent portion of this motion generates power in the second attacking mallet, while the double vertical generates power for the first.
In comparison, playing an inside to outside stroke is a mirror of this motion, beginning also as double vertical and shifting into a single independent.
Think down & rotating out (inside-outside) or down & rotating in (outside-inside)
Tips:
- For small intervals, the torque during the single independent part of this stroke MUST be great or the second pitch won’t speak as loudly as the first.
- At large intervals, this wrist rotation is less pronounced, since it costs less energy to output the same volume.
- Generally, there will be almost a straight line between the back of your hand and forearm when the first mallet makes contact with the bar.
- Use your wrist to produce the double lateral gesture and after a few months of practice, you will naturally harness finger control and power.
Double Lateral Strength Exercise
You’ll only need one pair of mallets for this exercise.
Step 1. Hold your pair of mallets up in playing position.
Step 2. Hold your free hand palm-down a few inches above your first striking mallet and snap that mallet up into your palm with rotary twist. The harder you hit the palm, the louder the second note will speak.
Overview of the Double Lateral Stroke:
1. The double lateral is one motion for two notes.
2. The double lateral does not function slowly.
3. The double lateral is a combination of two other strokes: first the double vertical, then the single independent.
4. Motion comes from the wrist. Think down & out or down & in.
5. How to Play Octaves (& Other Large Intervals) with Stevens Grip on Marimba
Clicking play on the video will start at the chapter on shifting to large intervals and octaves.
Playing Octaves
Do you struggle to perform octaves consistently on marimba? Have you heard your friends or other percussionists talk about the “octave grip”? Do you want to be able to outplay them at the next rehearsal? Keep reading to learn how!
Changing Intervals with Stevens Grip
First things first, in order to understand the octave grip, we must discuss shifting to large intervals. I know it seems straightforward, but there are common misconceptions about this grip and we need to cover all our bases to go over octave grip.
Refer to my article on how to hold mallets with Stevens Grip if you don’t know what rest position looks like or how to hold the mallets in your hand.
Step-by-Step Process to Making Interval Changes
Step 1
As we open the interval, the inside mallet will spin slightly as finger 1 straightens and moves to the side of the mallet rather than underneath. While closing the interval, the mallet spins in the opposite direction and finger 1 will curl inward.
Step 2
As we open the interval, the mallet will be on the side of the thumb (rather than the pad). The thumb and finger 1 always work juxtaposed and finger 1 doesn’t curl under the mallet at large intervals. Note: *For large intervals that last a while, you can realign the thumb position from the side to the pad, though this is typically unnecessary.
Step 3
As the interval opens, the butt of the inside mallet will inscribe an arc extending from its resting place beneath the base of the thumb to the very first joint of finger 2.
Step 4
If your stick gets caught on the flesh at the base of finger 2 while shifting, you should move the butt closer to the base of thumb at rest position. In contrast, if you lack support from the palm, try bringing the butt away from the base of the thumb. If you tend to change placement of finger one and the thumb while playing, your mallet length is incorrect.
Step 5
Finger 2 supports the end of the inner mallet shaft & helps open and close the interval.
- Finger 2 is always bent. The only hinge which straightens is the first joint, right at the base.
- The joint at the base of finger 2 does most of the pushing and pulling of finger two. As the interval grows, the first section of finger 2 approaches a straight line with back of hand.
- Keep finger 2 in firm contact with the last inch of the mallet shaft. Finger 2 will apply more pressure for extra support on large intervals, releasing when the interval changes.
- When closing a large interval, finger 2 snaps back into position to help close the interval.
Step 6
Don’t put your thumb in-between the shafts! Sometimes we find ourselves making this mistake (during large intervals especially) but this gets rid of the nimbleness and lack of tension that this grip was created for. Note: Stevens highlights this mistake and calls it the “Neanderthal Grip”. Not a good look.
Step 7
Finger 2 is only responsible for control and strength of the inner mallet, so it should never “push” the outside mallet to help open an interval.
Step 8
As the interval opens, finger 3 creates a straight line with the back of the hand, but finger 4 does not.
An Interval Shifting Exercise
To strengthen our outer mallet muscles (fingers 3 and 4), scratch an imaginary itch in the first joint of fingers three and four with those same fingertips.
Note: *When we move back to mallets, remember that unlike the exercise, finger four does not straighten with the back of the hand like finger three does. Finger four retains a secure grasp around the end of the mallet.
Octave Grip
With all this in mind, there isn’t necessarily an “octave grip” though there are some general guidelines we can refer to as we perform octaves.
As we perform octaves (and other large intervals):
1. Finger 1 (index finger) will be straight and on the side of the inner mallet. The thumb will be directly across from this finger, either touching the mallet with its pad or its side.
2. Finger 2 (middle finger) will pull the butt of your inner mallet into its base as you approach the largest intervals.
3. Fingers 3 and 4 will pull back to spread the mallets. Finger 3 will be straight with the back of your hand, but finger 4 will not.
4. Do not put your thumb in-between the mallet shafts. More on this above.
If your hands are smaller than mine (odds are they are), then I highly recommend reading the above section on changing intervals and come up with your own (healthy) personal way to perform octaves while keeping Stevens’ guidelines in mind.
6. How to Create Dark and Bright Sounds on Marimba (Beating Spots)
Clicking play on the video will start at the chapter on shifting to beating spots.
What is tone? What kind of tones do we want when playing marimba? How do we get different tones? Today, that’s what I’m here to answer.
As I discussed in my two-mallet video, the best beating spot is in the center of the bar, and the second best is the edge of the bar, especially when it comes to accidentals.
Manipulating Sound Color
The variables which affect tone are our volume, beating spots, and angle of our stroke. With four notes, that gives us twelve factors which affect the tone of just one chord. In a musical context, that creates an overwhelming number of musical choices for us to consider!
In his book “Method of Movement”, Stevens outlines six timbre combinations ranging from dark to bright. A “dark” sound has strong fundamentals and emphasis on lower pitches, while “bright” sounds refer to strong harmonics and an emphasis on higher pitches. I play these examples in my four-mallet video–which is linked right above us!
Of course, lower notes will be darker and higher notes brighter, but where we strike the bar will also affect its color. Striking in the center of the bar, furthest from either node, will produce a strong fundamental, and thus a dark sound. The closer to the node we strike, the brighter the tone.
*Something to keep in mind: the further from the node we strike, the more resonance we achieve from the bar. On marimba, brighter notes tend to not last as long as darker ones.
The Stevens grip was created by renowned marimbist and percussion Leigh Howard Stevens. Stevens’ book “Method of Movement for Marimba” was detrimental in the creation of this guide, and I highly recommend you buy it for yourself. On top of the hundreds of exercises, the first 1/3 of the book is a guide to each type of stroke, interval shifting, general playing advice, how to practice effectively and notes on musicality.
If you found this blog helpful, tell me on Instagram, YouTube, Facebook or you can even donate as low as $3 to my Ko-fi to support me as I continue doing this work!
Until next time, happy practicing!