
Today, we’ll be taking a look at how to play the snare drum, including holding the sticks, some rudiments (scary!), and where to strike the drum.
Once we line it up like that, it sounds pretty simple right?
Let’s get started!
How To Play Snare Drum
ELEMENTS OF TECHNIQUE
There are four elements of good matched technique.
These elements are:
- fulcrum
- balance point
- hand positioning
- drum height
1. Fulcrum.
The fulcrum is the pivot point around which your stick bounces.
The fulcrum is created by placing the stick in between the pad of your thumb and the second joint of your index finger (the joint closest to your fingertip).
2. Balance point.
You will create your fulcrum at your stick’s balance point, which will typically be around one-third of the way up from the butt of the stick.
If you are using Vic Firth brand sticks, the flag on the shaft is the balance point and you should place your thumb on that flag to create your fulcrum.
3. Hand position.
You can remember this by calling it the “45 and 45 rule.”
Once your fulcrum is in place and your sticks are in hand vertically parallel, rotate your hands inward until your thumbs are facing one another at a 45 degree angle (not 90).
Now, move the heads of your sticks to form another 45 degree angle between one another. Bring your arms down to playing position at your drum.
4. Drum height.
Your drum should be just under your waist so that your arms are almost parallel to the floor, reaching only slightly downward as to not inhibit any wrist movement.
There should be a straight line from the wrist to the tip of the stick, and 1½ to 2 inches between your hands and rim of the drum.
The more you practice, the more comfortable you will become with these four elements.
The overall goal of this grip is to keep you as relaxed and in control as possible.
This grip, like all grips, is to help the performer play his or her instrument optimally. If you are tense while playing, the speed and accuracy at which you will be able to perform will be severely limited, not to mention how tension mutes the sound produced by the drum.
THE PISTON STROKE
The piston stroke is named after a mechanical component which shoots up and down, and in that same vein we’re gonna shoot down and immediately back up with the head of our stick.
We begin with both sticks in the up position, and hinging from our wrists, strike the drum and rebound back with the same velocity. Keep your fulcrum together but let the stick to bounce in your hand as you play.
Our other fingers can be lightly wrapped around the stick, but they aren’t there for extra power. Your power should come from the velocity of your stroke.
I think of this stroke as tossing the stick toward the drumhead with a combination of fingers, wrist, and arm.
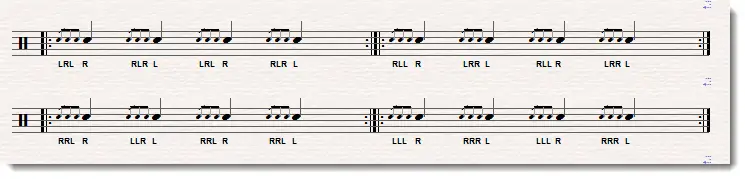
I’ve added a few exercises here if you want some free material to help you practice.
OPEN ROLLS
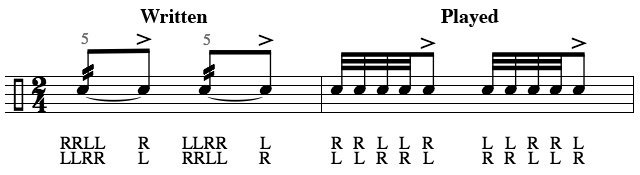
The double stroke (aka “the open roll”) is when one stroke is used to hit the drum twice. This will be typically notated with two parallel lines on the stem of a note.
Since lots of percussion notation isn’t standardized, the open roll may also appear as an individual line on the stem, though this is less common. Most of the time this single line on a stem just means to hit the drum twice instead of once, and not necessarily telling you that you need to use a double stroke.
To achieve a double stroke, you must control the rebound of the stick.
Rather than hinging from your wrist like with the single stroke, begin by hinging from your elbow and add the middle finger to support your fulcrum as needed.
This technique can be difficult to master, but with practice it will be extremely valuable to your future as a percussionist.
Note: do not lock your wrist. You don’t want to hinge from your wrist, but don’t tense up and not allow any movement. This will inhibit the motion of the stick. Stay relaxed and confident in yourself as you practice.
The five stroke and seven stroke rolls are great rudiments for improving your double stroke.
CLOSED ROLLS
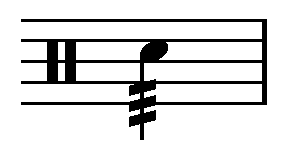
The closed roll, or the buzz roll, is a multiple bounce roll which I typically think of as one stroke to get three hits out of the drum, though more bounces are needed from time to time. I’m in university and ninety-nine percent of the closed rolls that I perform are triple bounce.
The buzz roll is notated with either three lines or a z on the stem.
Closed roll = fulcrum + elbow hinge
Simply, the closed roll is your fulcrum plus an elbow hinge but we don’t really need our middle fingers for support this time. Rather, hold the stick in the down position longer for more bounces and simply lift up to end the sound.
Connecting these hits evenly from hand to hand will result in a consistent sounding roll.
Practice the exercises here and change the pressure of your fulcrum based on how consistent your roll is. Aim for a sound that is a sort of solid fuzz like white noise or the ocean.
FLAMS

A flam is an attack with one grace note, so you would hit the drum twice using two single strokes, either left-right or right-left.
Even though we’re using two strokes, think of this as one motion, not two separate ones.
Two great rudiments to practice developing your flam technique are the flam tap and the flam accent rudiments.
Just an extra tip: if you have multiple flams in a row, use the same hand for the grace note every time. If we were to even out the rhythm with this sticking, it would be alternating single strokes. This alternating sticking makes the flams more consistent and easier at higher tempi.
For consistency, I would recommend keeping the grace note stick at a lower height than your other stick.
DRAGS

A drag is notated with two grace notes.
The overwhelming majority of the time I think of drags as a flam but with the grace note played as a double stroke rather than a single. Therefore, you would get either left-left-right or right-right-left.
Occasionally we alternate the stroke, so right-left-right or left-right-left, though this isn’t something you need to think about as a beginner.
With flams, drags, and ruffs make sure you are emphasizing the final note because that’s what the grace notes are gracing.
RUFFS
A ruff is notated by three grace notes leading to a final, fourth strike.
For snare, I recommend using the French technique to accomplish this: a single stroke, followed by a double and then another single stroke, this time with emphasis. So, the sticking would be right-left-left-right or left-right-right-left.
For keyboards and timpani, as we will go over in the future, we will be using alternating strokes (the four-stroke ruff).
Wild particular note here: Sometimes you will see players refer to a drag as a ruff.
According to Robert McCormick in his book “Percussion for Musicians”, he makes the distinction that a drag has two grace notes on the same hand, whether they are single stroke taps (rudimental) or double stroke (concert), and a ruff has three grace notes. He calls these four stroke ruffs, played with alternating single strokes, because there are four strokes total if you alternate your sticking.
At first, I called the (French) sticking that I recommended above a “three-stroke ruff”, but that’s not accurate because the three-stroke ruff is actually an alternative name for the drag. Now I know we can generally just say the single-double-single ruff has a French sticking.
With each of these rudiments we emphasize the final note.
BEATING SPOTS
Now that we’ve covered the basic strokes and techniques on the snare drum, lets talk about where to strike the drum.
Firstly, we need to stand with the snare release lever facing us and lined up with the center of our person. The snares, which stretch along the bottom of the head, should be extending evenly under your beating spots for a consistent sound.
Imagine a straight line extending from the rim closest to you across the head to the rim furthest away. Your beating spots should mirror one another symmetrically on each side of this imaginary line.
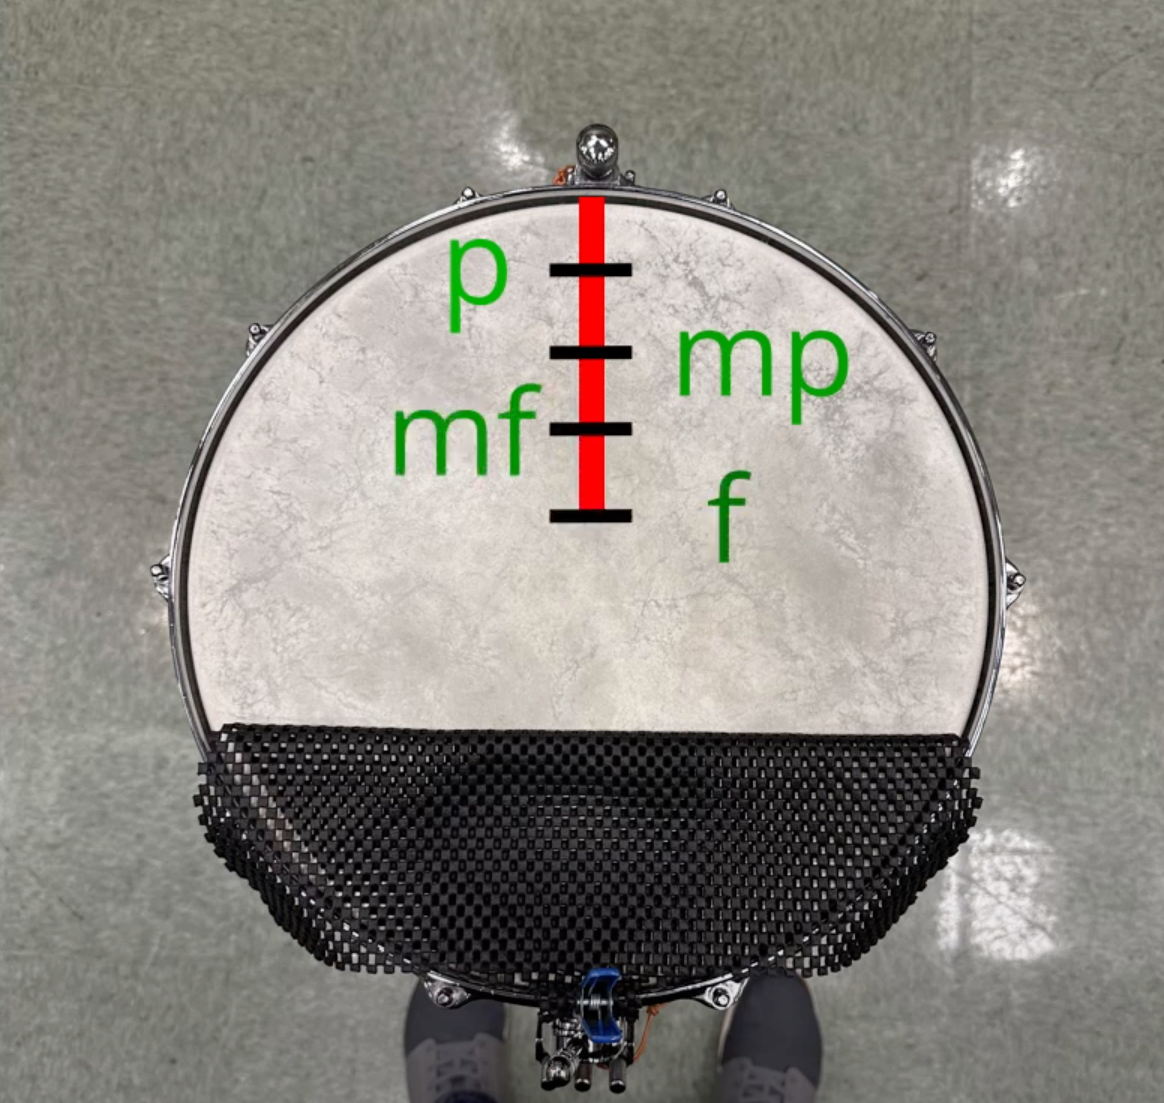
Where you strike the head of the drum will determine the quality of sound that is output. At piano, we want to strike about an inch away from the rim.
Mezzo piano is three inches from the rim, mezzo forte five, and forte is about seven inches.
Beating Spots
f = 7 inches
mf = 5 inches
mp = 3 inches
p = 1 inch
We don’t keep our stick heights way in the air for all beating spots either—your stick height should match the distance to the rim. If you are playing at a piano dynamic, your sticks should only be an inch from the head of the drum.
A helpful formula my teacher gave me is:
Stick height = Distance to the Rim
SH = DR
Thanks for reading and happy practicing!

One Response